
 Worcester (Head Office) 01905 458 000
 3d@stanfordmarsh.co.uk
- Commercial 3D printers & additive manufacturing solutions
-
-
- Order sample print


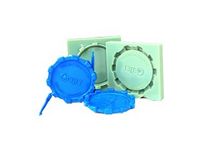
Blow Moulding With 3D Printers
Blow molding is a manufacturing process that makes hollow plastic parts, such as bottles and other containers.Manufacturing these items is rapid and cost efficient, but prototyping tends to be slow and costly. In the past, blow–molding companies have largely avoided prototyping due to high cost and long lead times. Blow–mold design and the specification of process parameters require skill and precision. A small change in the pinch–off or vent design, die temperature or blow pressure can dramatically affect the molding results. Prototyping enables designers to validate these parameters and accelerate design approval.
Blow molding uses many common plastics, including polystyrene, polycarbonate (PC) and polyvinylchloride, and resins including polyethylene.
The blow–molding process has three major variations: extrusion blow molding (EBM), injection blow molding (IBM) and injection stretch blow molding (ISBM).
EBM: An extruder drops a parison (hot, hollow tube of plastic) between two mold halves. One end of the gap is sealed and the other end is left open. Air is injected through the open end, forcing the malleable plastic against the mold walls. Upon cooling, the plastic retains the contour of the mold. This process can produce very large containers, but is not suitable for all materials.
IBM: This two–step process begins with injection molding a preform, which is then heated, placed in a blow mold and inflated. Compared with EBM, this process allows for more careful control over part walls and results in better transparency and surface quality. ISBM: This method incorporates an additional step where the injection–molded preform is heated, then mechanically stretched before inflation. This contributes to the part’s strength and wall uniformity.
Application Checklist
Patterns 3D printed with PolyJet or FDM are a best fit for blow molding when:
- Production levels are low to moderate or custom
- Multiple designs must be considered
- Prototypes are required from the final plastic material
- Design changes are likely
Benefits of PolyJet and FDM tools for blow molding include:
- Lead time reduced by 30 to 70 percent
- Prototype mold cost reduced by 40 to 80 percent
- Stability, eliminating distortion with heat
- Durability through hundreds of cycles
- Little or no need for post processing
- PolyJet or FDM 3D Printed Tools
3D printing with PolyJet or FDM Technology offers an opportunity to prototype blow–molded products faster and at lower cost. With PolyJet or FDM 3D printing, companies can design a mold, build the tool and blow mold near–production quality prototypes. Advances in PolyJet and FDM 3D printing, including improved surface quality, durability, build speed and cost, make blow-mold prototyping a much more rewarding process. The two Stratasys 3D printing platforms (PolyJet and FDM) can be applied to all three blow–molding methods.
Steps
- Designing the tool: It is important to design the tool with additive manufacturing in mind. Be sure vent areas relieve extreme temperature or pressure and the pinch design will be strong enough to function. Also, metal plates should be inserted on top to absorb the impact of the blowing pin against the mold.
- Printing the tool: Print the tool with either PolyJet or FDM technologies with the correct build orientation and parameters.
- Post processing: Perform secondary processing on the mold to alter its surface finish if desired. Insert locator pins or metal plates if necessary. Apply release agents or coatings to prevent blown plastic from sticking.
- Mounting: Insert the prototype mold halves into the match–plate cavities and align using the alignment pins (either designed into the part or inserted as a secondary process).
- Molding: Use the molding parameters required to increase mold life and maximize part quality.
- Evaluation: Determine whether the shape, mold design or parameters must change to build a successful production tool.
Considerations
When using PolyJet or FDM for either an insert into a mold base cavity or a full tool, build proper clearances into the model so alignment pins or mold halves fit together. Orient the tool in the build chamber to give it the best surface finish and, depending on the goal of the prototype mold, use filler and sand the mold to get the desired surface. The filler will also help to seal the mold and produce a better part.
The material used to build a prototype mold should be heat–resistant enough to not deform after each cycle, and durable enough to last through as many cycles as necessary for prototyping. PolyJet and FDM 3D printing technologies each offer suitable materials.
The insulating properties of PolyJet and FDM materials affect cycle time. Options to minimize this include cooling-system inserts in the 3D–printed part or through the aluminum molding base. Simply applying compressed air can also speed cooling.
Customer Story — FDM
A container manufacturer challenged Stratasys to reduce both cost and time for the development of blow–molded prototypes. Specifically, the goal was to prototype near–production quality parts in five days rather than seven weeks, and to do it at a lower cost.
The company selected a bottle 6 in. (152 mm) tall and 3 in. (76 mm) in diameter for the pilot project. Using Fortus PC material for the tool cavity and a machined aluminum mold base, the blow mold was designed and built in just two days. With only minor changes to the tool design and molding process, the bottle was blow molded in BP Solvay Fortiflex HP 58, a high–density polyethylene. The entire process was completed in less than five days, and the molded prototypes met the criteria for near–production quality.


Customers who were interested in this product also viewed
-
 More information
Injection Moulds with a 3D Printer
PolyJet 3D Printing has made it feasible to quickly create custom injection molds that produce low volumes of parts in the final production plastic.
-
 More information
Thermoforming With PolyJet or FDM 3D Printer
Thermoforming is the collection of manufacturing methods that heat and form sheets of extruded plastic